Gypsum-based floor screed has gained significant popularity due to its numerous advantages and versatile applications. Whether you are considering using gypsum grooved screed boards, combating gypsum screed laitance, determining the ideal moisture percentage for a gypsum screed, or seeking guidance on sealing a gypsum screed floor for tiling, this comprehensive guide will provide you with all the essential information.
What is Gypsum-Based Floor Screed?
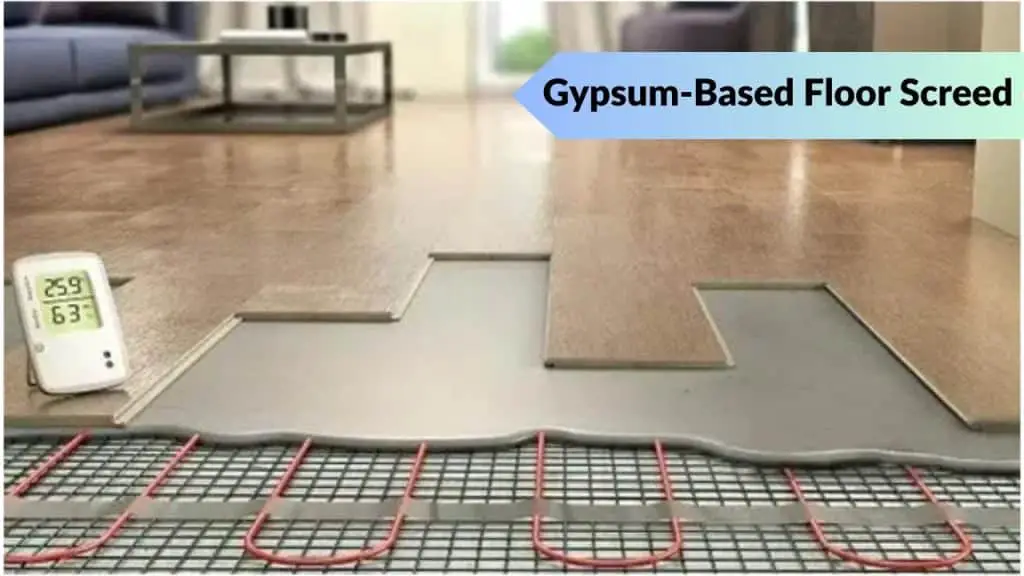
Gypsum-based floor screed is a mixture of gypsum, sand, and water, used as a levelling compound for flooring applications. It offers several advantages over traditional screeds, including rapid drying times, excellent thermal conductivity, and superior fire resistance. By understanding the various aspects of gypsum-based floor screed, you can make informed decisions for your construction projects.
The Benefits of Gypsum-Based Floor Screed
Rapid Drying Times:
Gypsum-based floor screed boasts exceptional drying times, enabling faster installation of floor coverings. This feature reduces project timelines and allows for quicker occupancy of the building.
Enhanced Thermal Conductivity:
Due to its unique composition, gypsum-based floor screed provides improved thermal conductivity, facilitating efficient underfloor heating systems. This attribute ensures a comfortable living or working environment while minimizing energy consumption.
Fire Resistance:
Gypsum-based floor screed exhibits excellent fire resistance properties, making it a preferred choice for buildings that prioritize fire safety. By incorporating gypsum-based floor screed, you can enhance the overall fire protection of your structure.
Minimal Shrinkage:
Unlike traditional cement-based screeds, gypsum-based floor screed experiences minimal shrinkage during the drying process. This characteristic reduces the risk of cracking and ensures a durable and long-lasting flooring solution.
Gypsum Grooved Screed Board: Enhancing Performance and Aesthetics
Gypsum grooved screed board is a specialized type of gypsum-based floor screed that features grooves or channels on its surface. These grooves serve multiple purposes, including enhancing the bond strength between the screed and subsequent flooring layers, improving the overall structural stability, and facilitating effective water drainage.
Advantages of Gypsum Grooved Screed Board
Enhanced Bond Strength
The grooves on gypsum grooved screed boards create additional surface area, promoting stronger adhesion between the screed and the flooring material. This results in improved stability and longevity of the floor covering.
Structural Stability:
Gypsum grooved screed boards offer enhanced structural stability due to their unique design. The grooves act as reinforcing elements, increasing the load-bearing capacity of the screed and minimizing the risk of cracks or deformations.
Efficient Water Drainage:
The channels on gypsum grooved screed boards facilitate proper water drainage, preventing the accumulation of moisture that could lead to the growth of mold or other issues. This characteristic is particularly beneficial in areas prone to high humidity or frequent water exposure.
Combating Gypsum Screed Laitance: A Practical Approach
Gypsum screed laitance refers to the thin layer of fine particles that forms on the surface of newly laid gypsum screed during the drying process. While laitance is a natural occurrence, it can negatively impact the adhesion and performance of subsequent floor coverings.
Overcoming Gypsum Screed Laitance Challenges
Mechanical Abrasion: The most effective method to remove gypsum screed laitance is through mechanical abrasion. This process involves using suitable equipment to gently remove the laitance layer, exposing a clean and sound surface ready for the application of floor finishes.
Chemical Treatment
Chemical treatments are available to aid in the removal of gypsum screed laitance. These products contain specialized compounds that break down the laitance, facilitating its removal through rinsing or light scrubbing.
Determining the Optimal Moisture Percentage for a Gypsum Screed
The moisture percentage in a gypsum screed is a critical factor that directly affects its performance and the successful application of subsequent floor coverings. Determining and maintaining the optimal moisture level is crucial to prevent issues such as excessive shrinkage, cracking, or the failure of adhesives.
Moisture Testing Methods
Several methods can be employed to assess the moisture percentage in a gypsum screed. These include:
Electronic Moisture Meters:
Electronic moisture meters utilize electrical conductivity to measure the moisture content within the screed. This non-invasive method provides quick and accurate results.
Carbide Bombs:
Carbide bombs involve taking samples from the screed and reacting them with carbide pellets. The resulting gas pressure indicates the moisture content. Although this method requires laboratory testing, it provides highly accurate results.
Calcium Carbide Method:
The calcium carbide method involves extracting a sample of the screed and reacting it with calcium carbide. The resulting gas pressure indicates the moisture percentage. While it is a reliable method, it requires specialized equipment and expertise.
Sealing a Gypsum Screed Floor for Tiling: Best Practices
Sealing a gypsum screed floor before tiling is essential to ensure proper adhesion, prevent moisture damage, and prolong the life of the tiled surface. The sealer acts as a protective barrier, reducing the risk of water penetration, efflorescence, or other tile-related issues.
Steps for Sealing a Gypsum Screed Floor
Surface Preparation: Thoroughly clean the gypsum screed floor, removing any dust, debris, or contaminants. Ensure the surface is smooth and free from irregularities.
Select an Appropriate Sealer:
Choose a sealer specifically formulated for gypsum screed floors. Consider factors such as the type of tiles, desired finish, and compatibility with the screed material.
Apply the Sealer:
Follow the manufacturer’s instructions to apply the sealer evenly across the entire floor surface. Use a suitable applicator or brush to ensure proper coverage. Allow the sealer to dry as recommended.
Perform a Test:
Before proceeding with tiling, conduct a small test by applying a tile adhesive to a sealed area. Verify proper adhesion and assess the results to ensure satisfactory performance.